 icon that appears to the left of the name of the Page.
A typical page layout includes Smart Graphics® controls such as button, gauges, sliders, etc. that trigger actions and provide feedback.
A Page has fixed size, its height and width are the same as the height and width of the touch screen and cannot be modified.
In
Design
Explorer a Page is marked with the
icon that appears to the left of the name of the Page.
To add a page to your design:
LaunchScreen Designer for a new or existing project.
In the Control Gallery,
select a page and then:
drag and drop the Page to the
desired location in the Workspace.
-or-
double-click on the Page in
the Control Gallery tool window
or-
press 
The Page is added and displayed in the Workspace.
Alternatively, click on the Add a Page 


 .
.
Notice that if using the drag and drop method, pages are drawn at the
location at which the mouse is released. When using the double-click
method or press key method, pages are added
to the top-most, left-most corner of the Workspace
By default, a newly created page is named Page1.
If more than one pages are added to the design, the number appended to
the name is increased by 1, for example Page2,
Page3. Pages can be renamed in the Property
Grid if desired.
NOTE: Page names cannot contain any of the following characters: / |
: * ? \ " < >. Only
single byte characters may be used for page names.
To modify Page properties:
Select the page in the Page Explorer, Design Explorer or the Workspace and adjust the page properties in the Property Grid as needed.
To close/remove a page from the Workspace:
Press the  button to close the Page
-or-
Select one or more Pages in the Workspace and press  /
/ 
-or-
Point to the Page inDesign Explorer
and un-check/click the Visibility
check box/icon. Note that Pages are not deleted from the project but merely
hidden.
Alternatively, you can close all open pages by clicking on the  icon from the Standard
toolbar of Touch Screen Designer.
icon from the Standard
toolbar of Touch Screen Designer.
To delete a Page:
Select one or more page(s) in the Workspace, Design Explorer
Choose Deletefrom the right-click menu
-or-
Press  .
.
A prompt appears, asking whether you are certain that you want
to delete the page(s) and all associated contents: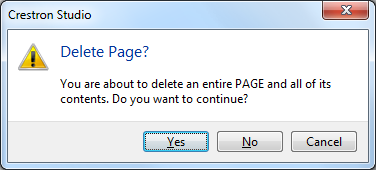
Click Yes
to delete the page(s); otherwise, click No.
Note that when a page is deleted, Crestron Studio®
deletes the symbol connected to it and all attached programming.
Alternatively, choose Cutfrom the right-click menu or press  .
Note that when using this option any selected pages are deleted without
waiting for confirmation!
.
Note that when using this option any selected pages are deleted without
waiting for confirmation!
To show a faceplate for selected Page:
 on the title bar of the Page
To add a Smart Graphics® Control to a Page
Select a Smart Graphics® Control in the Control Gallery.
Double-click
on it or press the key. The Smart Graphics® Control
is added to the top-most, left-most corner of the Page.
-or-
Drag and drop it onto the Page. The
Smart Graphics® Control
is drawn at the location where the mouse is released.
TIP: Multiple Smart Graphics® Controls
can be added to the Page by pressing a number key (1 to 9) when simultaneously
dragging the control from the Control Gallery to the Page. For example,
if you want to add 3 Buttons to a Page, hold down the  key and drag the Button
to the Page.
key and drag the Button
to the Page.