Select the device in the System Tree and then right-click on it.
Choose Open
Faceplate Designer:
If multiple Designers are available, choose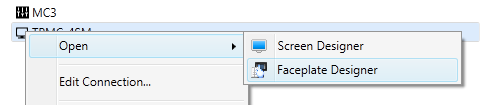
The Faceplate Designer opens displaying the device faceplate in the center.
Faceplate Designer allows you to configure and order engraved faceplate buttons from Crestron or print insertable plain-paper button labels on a laser printer.
To start Faceplate Designer
Select the device in the System Tree and then right-click on it.
Choose Open
Faceplate Designer:
If multiple Designers are available, choose
The Faceplate Designer opens displaying the device faceplate in the center.
To select a faceplate color
Click on the outer portion of the device faceplate to select the faceplate itself. When selected, the faceplate is outlined in blue.
Click
on the Models drop-down combo
box's drop down arrow and select the desired color.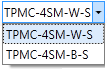
The Crestron model numbers represent the different colors of the same
device type.
Click
on the Show/Hide Areas  button to toggle on/off the display of the engraveable area outlines
 .
.
To change the faceplate's button layout
Go to the
Parts Gallery tool window
then click on an applicable button type: triple, single, double, split
in the Parts Gallery.
The Parts Gallery tool window is displayed
only if the device has engraveable areas!
Drag and then float the new button type
over the target button (s). The target button(s) will be framed with
a yellow outline if the new button type is allowed. For example, triple
and double buttons cannot be split; whereas, single buttons can.
NOTE: Some button types may
not be allowed in certain slots of the device. For example, a single
height button cannot be dropped in the bottom slot of C2N-CBD-*, C2N-CBF-*,
and INET-CBDEX-* keypads. In such case, the mouse pointer will change
to  when trying to drop the selected button type to any slots that may
be out of bounds.
when trying to drop the selected button type to any slots that may
be out of bounds.
Drop the new button type onto the target; Faceplate Designer revises the layout.
To fix unassigned buttons that were introduced into the button layout
Click on the applicable, allowable button type in the Parts Gallery, drag, float, and then drop it on the unassigned button; NOTE: an unassigned button is solid black
For
example, changing a triple button to a double button creates a double
button and single, unassigned button. (Unassigned
buttons cannot be engraved). A single or split button type must
be dropped on the unassigned button. Or, the unassigned button can be
combined with other buttons to create a double or triple button to fix
the problem.
To engrave a button
Click on the button. The active button is framed with a blue outline.
Type the first line of text in the Property Grid's Text One field.
To choose the font, click on the drop-down arrow in the Property Grid's Text One Font Family field and then click on the desired font.
Type the second line of text in the Property Grid's Text Two field.
To choose the font, click on the drop-down arrow in the Property Grid's Text Two Font Family field and then click on the desired font.
NOTE: The following fonts allow
you to add symbols for AV, Lighting & HVAC and other specialized applications:
Crestron Transport
Crestron Transport Outline
To choose a symbol, click one of the above fonts in the Text One Font Family or Text Two Font Family fields.
To display the available symbols for the selected font, click on the Text One or Text Two field's drop-down arrow, and then click on the symbol and press ENTER.
The symbol is displayed on the button. The alphanumeric character associated with the symbol populates the Text One or Text Two field; this character is also visible during symbol selection when the mouse pointer floats over the symbol. If known, this character can be directly typed into the Text One or Text Two field. For example, h in the Crestron Transport font is the Play Button symbol.
To display the Text One and Text Two text as two separate lines, click on the Is Two Line check box. The Is Two Line check box will not be shown if not applicable for a specific device.
To save engraved text and button layout
Choose
Save SystemName
from the File Menu or press


 . Both the faceplate configuration
and button layout are saved with your system.
. Both the faceplate configuration
and button layout are saved with your system.
NOTE: Unsupported faceplate
configurations will not be saved and an error message guiding you
how to fix the problem will be displayed.
To save faceplate configuration
Go
to the Configuration Gallery
tool window and then click the  button. Current configuration is saved with the name 'custom",
followed by a numeral and added to the Configuration
Gallery. Note: Unsupported faceplate configurations will not
be saved and an error message guiding you how to fix the problem will
be displayed.
button. Current configuration is saved with the name 'custom",
followed by a numeral and added to the Configuration
Gallery. Note: Unsupported faceplate configurations will not
be saved and an error message guiding you how to fix the problem will
be displayed.
The default
faceplate configuration is marked by the  symbol.
IMPORTANT: Previously saved faceplate configurations that are not supported anymore will no longer be displayed in the Configuration Gallery. Examples of deprecated configurations are faceplate designs with single height button in the bottom slot of C2N-CBD-*, C2N-CBF-*, and INET-CBDEX-* keypads.
To order the faceplate and engraved buttons from Crestron
Click
on the Create engraving file to send
to Crestron icon  in the Faceplate Designer toolbar to display the Order
Information dialog.
in the Faceplate Designer toolbar to display the Order
Information dialog.
On the Dealer Info tab, enter the appropriate information in the Billable Dealer Information text fields. Note that you won't be able to create an engraving order if you don't provide information in the following required fields: Dealer First Name, Dealer Last Name, Dealer Address Line 1, Dealer City, Dealer State and Dealer Zip Code.
On the Shipping Information tab, enter the optional shipping information in the Project Name, Project Location, and Project Description text fields.
Click on the Preview tab, to review the faceplate configuration and button layout BEFORE placing the order.
Click
on the Create
Order button.
In the Export
Engraving File
dialog, navigate to the location (if desired create a special folder
where to keep your engraving files) to which the engraving file will
be saved. Enter a valid file name in the File name
text field.
Click
on the Save
button. This launches the default e-mail client and automatically
generates a message addressed to the Engraving Department at Crestron
(engraving@crestron.com).
The body of the e-mail message
is formatted as follows:
Thank you for using our engraving
software.
***NOTE*** If this Purchase
Order # has not been previously sent to Crestron, this layout will
be used as your Purchase Order. Please refer to the Crestron price
list for pricing.
***NOTE*** This Engraver
project file MUST BE ATTACHED:
C:\MyFaceplateOrders\Faceplate_TPMC-4SM.zip
Press the Attach
button (highlighted above) to attach the Engraver project
file to the e-mail message. For your convenience the fully qualified
name of the Engraver project file is included in the body of the e-mail:
Click
Send to place your order.
If the e-mail client fails to launch or is not installed, manually
compose an e-mail message to engraving@crestron.com and attach the Engraver project
file.
|
NOTE: The Engraver project files generated by Crestron Studio® are stored in a .xml format and packaged in a zip archive file while the Crestron Engraver software generates Engraver project files with the extension .egr. The Engraving department will be able to process both (.egr and zipped .xml) types of Engraver project files! |