
Simple Network Management Protocol (SNMP) is a protocol developed to manage devices on an IP network. SNMP enables network administrators to manage network performance and to find and resolve network problems. Network management systems (managers) learn about problems by receiving trap messages from network devices (agents) implementing SNMP.
Crestron 4-Series, 3-Series control systems and 2-Series control systems (with minimum CUZ version 4.xxx) support SNMP, allowing Crestron products to be managed by popular network managers such as HP OpenView Network Node Manager and IBM NetView.
Crestron control systems are configurable only as SNMP agents, not managers. That is, Crestron control systems can be polled by managers for information and send trap messages to managers. They do not control other devices via SNMP.
To configure the control system for SNMP
Click the Enable SNMP check box.
If SNMP was previously disabled, this will first cause the system to reboot.
Click New Manager... button to specify the manager information as follows:

Type a Manager Name. Any manager name can be used. The string will be forced to upper case and has a maximum of 200 characters.
Type the manager's IP address in dotted decimal notation (e.g., 192.168.3.2) in the Manager Address field.
Select the SNMP version number.
If v3 is selected (2-Series processors only), this will enable the authentication and privacy check boxes. If authentication is being used, click the Use Authentication check box; if privacy is being used, click the Use Privacy check box.
Crestron's SNMP v3 support includes MD5 authentication and DES privacy. (SHA authentication is also supported, only configurable via MIBs.)
For 3-Series processors only, type a new community name OR select an existing community name from the drop-down box. The community name can be thought of as a password. Any community name can be used. For 2-Series and 3-Series processors, the string is case-insensitive with a maximum of 200 characters, but will be displayed in uppercase. Whereas, for Linux and Android devices, the string is case-sensitive with a maximum of 200 characters.
Repeat step 2 for each additional manager.
To edit the manager information, select the manager from the list and click Edit Manager.
To delete a manager, select the manager from the list and click Remove Manager.
Click the Security... button to configure the community name or password information for the specified SNMP version number, as follows:
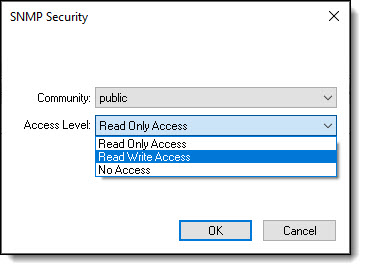
If any managers use v1 or v2, select the community name from the drop-down list. The community name can be thought of as a password. Any community name can be used. The string will be forced to upper case and has a maximum 32 to 255 characters depending upon the control system.
Select the access level from the drop-down list for the selected community. When a new community is created, it is given Read Only Access by default.
If any managers use v3 (2-Series processors only), type the Username. Any alphanumeric username can be used.
If any v3 managers use authentication, type the authentication password in the Password field. Similarly, if any managers use privacy, click the Privacy Password check box and type the privacy password. The authentication password validates identity. The privacy password is used to encrypt the packets. Any alphanumeric passwords can be used.
For 4-Series Control System - only, click the Security... button.
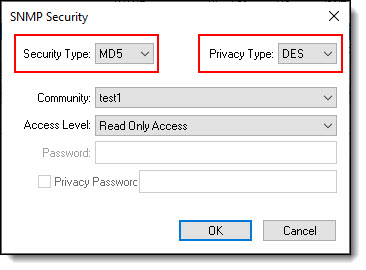
Click the New Rule... button to specify the conditions that will trigger the sending of trap messages to all managers, as follows:
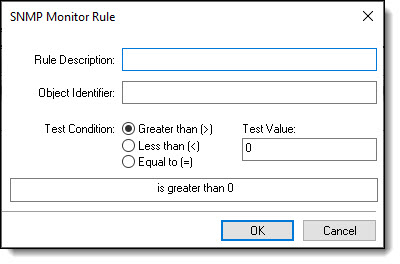
Type a Rule Description for the test condition. Any description can be used. The string will be forced to upper case and has a maximum of 200 characters.
Type the Object Identifier (OID). The OID locates the object to be tested within the MIB tree structure.
Select the condition to match against the OID, which can be "greater than", "less than" or "equal to".
Select the test value, which is a 32-bit signed integer (-2 billion to +2 billion).
Repeat step 5 for each trap rule.
To edit a rule, select the rule from the Monitor Rules list and click Edit Rule.
To delete a rule, select the rule and click Remove Rule.
Additional
To disable SNMP without deleting managers, security settings or rules, de-select the Enable SNMP check box. The next time you enable SNMP all the previous information will be restored.
To delete all managers, security settings and rules, click Clear Configuration, and then click Yes when prompted to confirm.