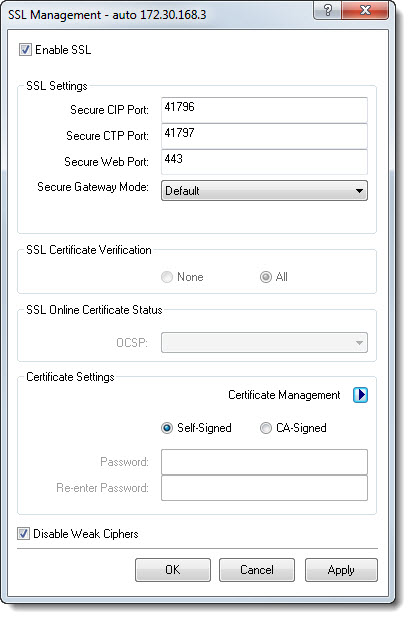
Use this function to enable SSL (Secure Sockets Layer) on control systems, the TPMC-V12/V15 JITC, and other devices that support SSL
Overview
Note: Android panels do not support SSL with Toolbox. However, they do support SSL for interaction at runtime between themselves and the control systems.
Control System SSL Management
To Enable SSL
Click on the Enable SSL check box to enable the SSL Settings and Certificate Settings group boxes:
SSL Settings
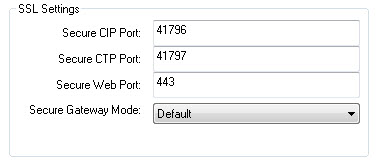
Use the SSL Settings group box to configure SSL-related secure port numbers and the Secure Gateway Mode:
Ports
The control system pre-populates the Secure CIP Port, Secure CTP Port and Secure Web Port numbers.
To change a Port number from a Pre-Populated Port Number
Click in the applicable Port's text box and type Port number.
Click the Apply button to apply the new Port number.
Secure Gateway Mode
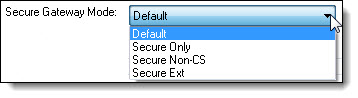
Click on the Secure Gateway Mode drop-down and select the applicable Mode:
Click the Apply
button to apply the Secure Gateway
Mode
Click the OK
button to reboot the control system:
NOTE: Devices running earlier Firmware Versions (< 1.600) may include SSL Fallback and possibly Min. TLS Version in the SSL Settings group box:
In this scenario, click the SSL Fallback drop down and select whether or not fallback to SSL v3 is permitted:
Similarly, click the Min TLS Version drop-down and select the minimum TLS fallback version:

Click the Apply button to apply the Secure Gateway Mode and if present the SSL Fallback and Min. TLS Versionsettings on devices running earlier Firmware Versions (< 1.600).
SSL Certificate Verification

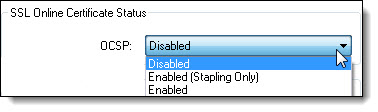
SSL Online Certificate Status
Certificate Settings
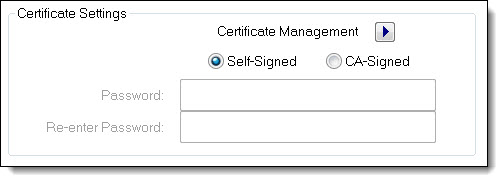
To enable SSL with a self-signed certificate.
Click the Self-Signed radio button.
Click OK to reboot the control system.
The above procedure enables an SSL connection using a self-signed certificate that you can use temporarily while you obtain a CA-signed certificate. Alternatively, you can continue to use the self-signed certificate so long as the client is interested only in data encryption and not server identity.
To generate a Certificate Signing Request (CSR)
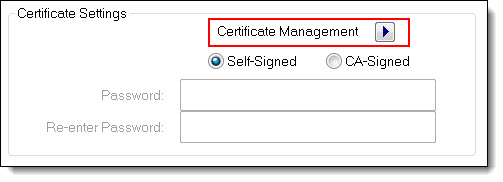
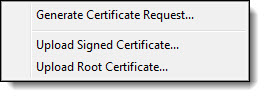
Click the Certificate Management arrow, and then click Generate Certificate Request.
Type the information of the organization requesting the certificate, as follows:

The domain name of the organization: the domain name is not transferable, and thus must be the one that will actually be used by clients. The domain name must be officially registered to the company; otherwise the certificate request will be rejected.
The e-mail address and department of the contact person making the request. (Email and Department are optional fields.)
The company name, city and state.
The password. This password must meet the following conditions: minimum length is 15 characters and must contain all of the following--at least one upper case character, one number and one special character.
The two-letter country code. The country code corresponds to ISO 3166 (International Standards Organization). The complete list is available on their Web site: http://www.iso.ch/iso/en/prods-services/iso3166ma/02iso-3166-code-lists/list-en1.html.
Click OK.
Locate the target directory where the CSR file will be saved on the hard drive, and click Save.
Toolbox will generate the CSR and private key and automatically save the two files in the \SYS directory of the control processor. The CSR file is an ASCII text file that is saved in the \SYS directory as: \\sys\request.csr. The private key is saved as: \\sys\srv_key.der for 2-Series and \\sys\srv_key.pvk for 3-Series.
To Obtain the Certificate
There are various Certificate Authorities, notable among them being Thawte and Verisign. For a fee, a CA investigates the organization hosting the server and issues a certificate vouching for the identity of the server. The procedure for obtaining/enrolling for a CA-signed certificate varies with each CA and is described on their Web sites. However, all CAs require the CSR.
The CSR is an ASCII file in the following format:
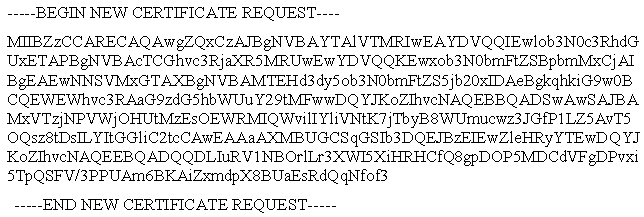
The CSR can be copied and pasted to the online enrollment form or sent via e-mail to the CA, along with any other pertinent information the CA requires. When sending the CSR it may be necessary to cut and paste the text between the "Begin new certificate request" and "End new certificate request" delimiters. To do this you can open the CSR file in a text editor such as Notepad.
The time it takes to receive the certificate will vary based on how quickly the Certificate Authority receives the required documentation.
Once the Certificate Authority verifies the identity of the requestor and validates the CSR, the CA issues the certificate. The certificate is usually sent to the requester via e-mail, in the following format:
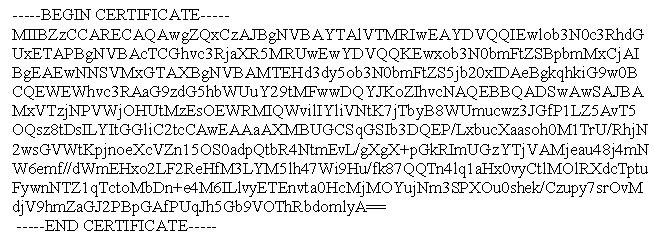
To upload the CA-signed certificate
Copy and paste the text between the "Begin Certificate" and "End Certificate" delimiters to a text file using a text editor such as Notepad.
Save the file to a location on the hard drive and name the file srv_cert.cer.
On the SSL Management dialog, click the Certificate Management arrow, and then click Upload Signed Certificate.
Locate the directory where you saved srv_cert.cer and click Open. This will upload the signed certificate to the \SYS directory of the 2-Series processor in DER format, i.e., \\sys\srv_cert.der.
To Upload the Root Certificate
Along with the signed certificate, all CAs also electronically give access to what is called a root certificate. A root certificate is a document that validates the CA itself. At the time of sending the signed certificate, most CAs provide a URL to where their root certificate is stored. The buyer of the signed certificate may then download the root certificate onto the server.
Copy and paste the text between the "Begin Certificate" and "End Certificate" delimiters of the root certificate to a text file using a text editor such as Notepad.
Save the file to a location on the hard drive and name the file rootCA_cert.cer.
On the SSL Management dialog, click the Certificate Management arrow, and then click Upload Root Certificate.
Locate the directory where you saved rootCA_cert.cer and click Open. This will upload the root certificate to the \SYS directory of the 2-Series processor in DER format, i.e., \\sys\srv_cert.der or 3-Series processor in PVK format, i.e., \\sys\srv_cert.pvk.
To Enable SSL with CA-signed Certificate
Click the CA-Signed radio button.
Click OK to reboot the control system.
The processor is now SSL protected with a
CA-signed certificate. Any Web browser attempting to communicate with
the server will display a locked icon on their screen.
Disable Weak Ciphers: Enabling Strong or All Ciphers

To Enable Only Strong Ciphers
Select the Disable Weak Ciphers check box; this will enable only Strong Ciphers.
To Enable All Ciphers
De-select the Disable Weak Ciphers check box;
this will enable All Ciphers:
both Weak Ciphers and Strong Ciphers.
TPMC-V12/V15 JITC SSL Management
To generate a Certificate Signing Request (CSR)
Click the Certificate Management arrow, and then click Generate Certificate Request.

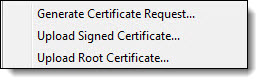
NOTE: On devices that do not support SSL disabling, the Enable SSL checkbox is grayed out.
Type the information of the organization requesting the certificate, as follows:
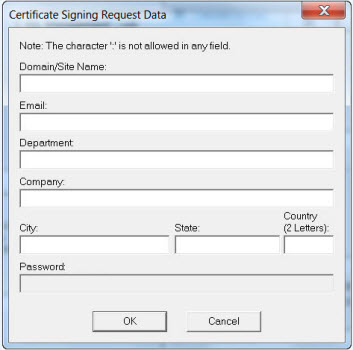
The domain name of the organization: the domain name is not transferable, and thus must be the one that will actually be used by clients. The domain name must be officially registered to the company; otherwise the certificate request will be rejected.
The e-mail address and department of the contact person making the request. (Email and Department are optional fields.)
The company name, city and state.
The two-letter country code. The country code corresponds to ISO 3166 (International Standards Organization). The complete list is available on their Web site: http://www.iso.ch/iso/en/prods-services/iso3166ma/02iso-3166-code-lists/list-en1.html.
Click OK.
Locate the target directory where the CSR file will be saved on the hard drive, and click Save.
Toolbox will generate the CSR file and private key and automatically save the two files. The CSR file is an ASCII text file that is saved as: cert_req.csr.
To Obtain the Certificate
There are various Certificate Authorities, notable among them being Thawte and Verisign. For a fee, a CA investigates the organization hosting the server and issues a certificate vouching for the identity of the server. The procedure for obtaining/enrolling for a CA-signed certificate varies with each CA and is described on their Web sites. However, all CAs require the CSR.
The CSR is an ASCII file in the following format:
The CSR can be copied and pasted to the online enrollment form or sent via e-mail to the CA, along with any other pertinent information the CA requires. When sending the CSR it may be necessary to cut and paste the text between the "Begin new certificate request" and "End new certificate request" delimiters. To do this you can open the CSR file in a text editor such as Notepad.
The time it takes to receive the certificate will vary based on how quickly the Certificate Authority receives the required documentation.
Once the Certificate Authority verifies the identity of the requestor and validates the CSR, the CA issues the certificate. The certificate is usually sent to the requester via e-mail, in .pem format (Privacy Enhanced Mail) which is a base64 ASCII encoded file. The .pem files contains both the certificate and key and consist of several blocks like the one shown below :
To upload the CA-signed certificate
On the SSL Management dialog, click the Certificate Management arrow, and then click Upload Signed Certificate.
Locate the directory where you saved the .pem file
and click Open. This will
upload the signed certificate to the panel.
To upload the Root Certificate
Along with the signed certificate, all CAs also electronically give access to what is called a root certificate. A root certificate is a document that validates the CA itself. At the time of sending the signed certificate, most CAs provide a URL to where their root certificate is stored. The buyer of the signed certificate may then download the root certificate.
Save the file to a location on the hard drive.
On the SSL Management dialog, click the Certificate Management arrow, and then click Upload Root Certificate.