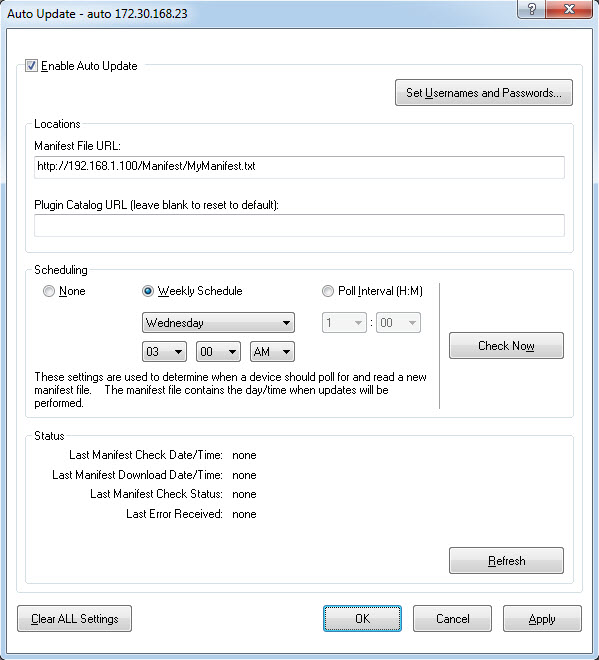
The Auto Update Tool retrieves device updates, update instructions and system/device modifications from a single, centralized location on a remote server. This centralized location can reside on a web server running on a control system, a mycrestron.com portal or a customized dealer/user-maintained private server.
This significantly streamlines and automates the device update process.
Use the Auto Update function to perform the following tasks:
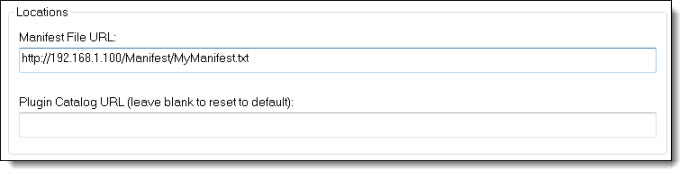
Specify the URL for the location of the Manifest File.
The Manifest File contains the update procedures and schedule that specifies how and when the downloaded updates are installed--as well as which firmware updates and system/device modifications are made.
(See Server and Device group boxes below.)
Auto Update Dialog Box
To Enable Auto Update
Select the top-left Enable Auto Update check box to enable the Auto Update Dialog Box:
Click the Set Username and Passwords.. button to set the user name and password for logon to the remote server, web server or mycrestron.com portal hosting the Manifest File:

In the dialog box, type the username and the password in the respective Username and Password text boxes in the Server and the Device group boxes, as applicable.
Note: Control systems will allow separate usernames and passwords in both the Server and the Device group boxes. The device username and password is for the control system to connect to the devices.

Server group box: Username and Password apply to both the control system and its downstream authentication-enabled devices.
Device group box: Username and Password apply to the control system.
Select the bottom-left Show Password check box (optional) to display the password and click the OK button:
In the Locations group box, type the Manifest File URL address and the Plugin Catalog URL address in their corresponding text boxes:
Note: The Manifest File contains update procedures--which may include firmware updates and system/device modifications.
In the Scheduling group box, select the Weekly Schedule radio button to schedule the Auto Update for daily updates at a specific time -or- on a specific day of the week and at a specific time:

In the above example, Auto Update checks Daily for firmware updates at 1:00 am
Use the day and time (hour, minute(s), AM/PM) drop-downs to set the Auto Update's date and time:
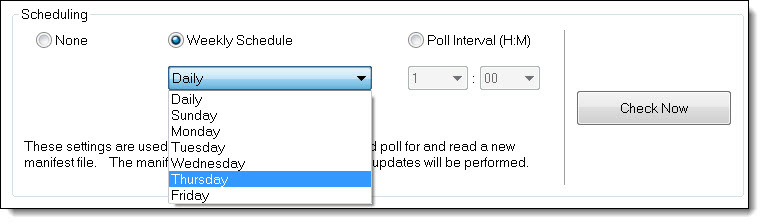
Alternatively, select the Poll Interval (H:M) radio button and use its set of corresponding drop-downs to designate the interval at which to check for updates:

Note: Control systems can poll only by the hour; all other devices can poll by hour and minute(s).
Click the Check Now button to check for updates in real-time/on demand:
Note: The downloaded Manifest File specifies when the auto update content is actually installed.
In the Status group box, click the Refresh button to refresh the Auto Update status:
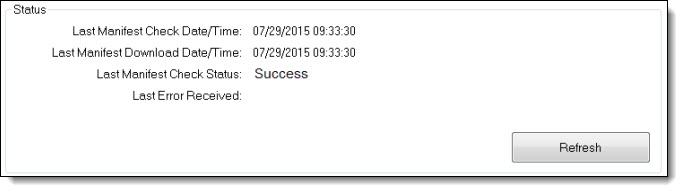
Note: The Check Status reflects the status of the last completed check--not the check currently in progress. Periodically, click the Refresh button to monitor the check currently in progress.
At the dialog box's bottom right, click the Apply button to apply the dialog box settings and then click the OK button to exit:

The Cancel button discards modified settings from the current session.
At the dialog box's bottom right, click the Clear ALL Settings button to clear all existing settings: