Add, Edit, Remove, or Delete an Attribute
An Attribute is a monitored signal for a room, such as room lights, system power, and so foth. An attribute can be a digital, analog, or serial signal and is assigned a join number. The join number must have a corresponding signal mapped to the Crestron Fusion® software symbol in the SIMPL program. Custom attributes require changes to the Crestron Fusion symbol and to the SIMPL program to function. An attribute must be assigned to a room in order for that room to monitor the attribute signal. Crestron Fusion supplies attributes that are applied to all rooms by default. You can keep or disable any of these, and you can add attributes of your own making.
In certain situations, an attribute used in a list, such as the Attributes Tab , can be used as a filter to display only certain types of information.
You can:
Apply Attributes to All Symbols in a Room or Node
Override an Attribute on a Symbol
Add an Attribute
An attribute can be added to Crestron Fusion via the Attributes or Objects tab in the tree view. Adding an attribute via the Attributes tab allows you to add the attribute to a particular node, while adding an attribute via the Objects tab puts the attribute in the general attribute pool.
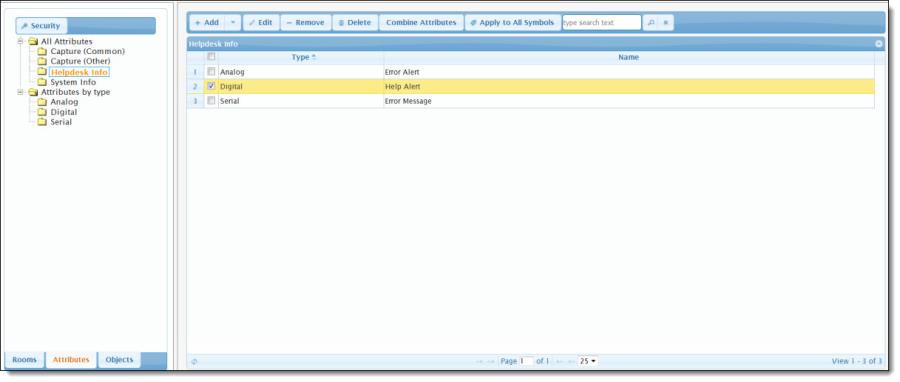
- Select the Attributes tab or the Objects tab in the tree view and select the desired attribute node or the Attributes node.
- Select Add Attribute in the Attributes tab, or select Add in the Objects tab. The Add Attribute dialog box opens with the Attribute Details tab displayed.
- Enter a name for the new attribute in the Name: field. The red asterisk adjacent to the field indicates that it is required.
- Select the type for the attribute from the Type drop‑down menu. The Choices are Analog, Digital, and Serial. Each of these choices affects the rest of the fields in the Attribute Details tab.
- If Analog is selected, the Logical Operator drop‑down menu contains Sum, Average, Minimum, Maximum, and LAST. If Digital is selected, the Logical Operator drop‑down menu contains And, Or, Exclusive Or, and Last. If Serial is selected, the Logical Operator drop‑down menu contains Concatenate and Last. Make the selections appropriate to your situation. Refer to Attribute Logical Operators for more information.
- The selection in the Type drop‑down menu also affects the choices in the Graphic Set drop‑down menu. For the Analog and Digital selections, the Graphic Set drop‑down menu allows you to choose from None, Arrows_(Left-Right), Arrows_(Up-Down), Dash_Digital, Default_Analog, Default_Digital, Error_Status, Help_Request, Lights, Locks, Online_Status, Room Occupancy, and Sounds. The Serial selection renders the Graphics Set drop‑down menu unavailable. Make the selection appropriate to your situation.
- The selection in the Type drop‑down menu has a limited effect on the Button Change Text field. For the Analog and Serial types, it remains as stated. If Digital is selected, it becomes Button On Text and Button Off Text. Make the selections appropriate to your situation.
- The choice you make in the Type drop‑down menu also affects the fields in the Default Settings field on the page. When Analog is selected, the Join, Min. Value, and Max. Value fields are accessible. The Slot field is automatically populated by 2 and not accessible. When Digital is selected, only the Join field is available and the Slot field is populated by 1. When Serial is selected, only the Join field is available and the Slot field is populated by 3.
- Select Read, Write, or Read‑Write from the IO Mask: drop‑down menu. This is not affected by Type drop‑down selections.
- Select the Log Setting tab to set the destination options for the Crestron Fusion log files. The destination for the log file can be set to RoomView Log by selecting the check box of the same name in the Log Destination area of the field. Checking one of these will also cause the fields and controls described below to display.
- The logging rule can be set to Alert Always by selecting the Alert Always check box. This will always send an alert indicating that an entry has been made to either the RoomView Log or the Crestron Fusion database. Selecting this check box disables the Operator drop‑down menu, Log Threshold radio buttons, and Alert Once check box.
- The Operator drop‑down menu allows you to set the threshold criteria for log file change notification based on the Value and Percentage radio buttons and the Log Threshold value.
- The Operator radio buttons allow you to specify whether the threshold for notification is a value or percentage.
- The Log Threshold field contains the value the Operator drop‑down menu works against. For example if your operator is Equal To and the Value radio button is selected, when the logging event reaches the value in the Log Threshold field, a log event will occur.
- The Alert Once check box allows you to indicate that you only want to be alerted once when a change to the log files is made.
- When your selections are complete, select Save & Close to commit your choices.


NOTE: Refer to Attribute Details to view a table of the fields and drop‑downs on the Attribute Details tab. This topic is provided as a way to keep the Attribute Details open for reference as you enter the required information.
NOTE: Read indicates that Crestron Fusion reads data from the control processor (such as data out). Write indicates that Crestron Fusion can write to the control processor (such as control in). Read‑Write indicates that Crestron Fusion can do both.
NOTE: If you do not select the RoomView Log check box, the log file will still be generated but it will be written to the Crestron Fusion database.
Add Attribute Node
You can add nodes to the Attributes tab in the tree view to categorize your attributes:
- Select the desired root node (All Attributes or Attributes by Type) or another parent node, and select Add Node from the Add drop‑down menu. The Add Attribute Node dialog box will open.
- Enter the name of the new node in the Name field. The red asterisk indicates that it is a required field.
- Select Save & Close to create the node. Your new node will appear under the selected parent node.
Edit an Attribute
You can edit an attribute in either the Attributes tab or the Objects tab of the tree view:
- Select the Attributes tab or the Objects tab in the tree view and select the desired attribute node, or the Attributes node as shown at the beginning of this topic.
- Select the attribute you wish to edit by selecting its checkbox or by selecting it directly from the menu. If there are many attributes in your system, use the search feature or the page controls below the list to find the desired attribute. Select Edit to change it. The Edit Attribute dialog box opens with the Attribute Details tab displayed.
- With the exception of the Name field the editable fields are controlled by attribute type as specified in the Type drop-down menu. Refer to step 4 in Add an Attribute above for more information. Make the desired changes and select the Log Setting tab to continue.
- Make any desired changes to the log settings. Refer back to step 7 in Add an Attribute above for more information. Select the Email Rules tab to continue.
- Select a template from the Email Template drop‑down list. The selections are made up of the default email templates that are installed with Crestron Fusion and any custom templates that you decide to create. The template should default to the type of attribute you are editing.
- Select the Alert Always check box if you wish to send an email alert to every role selected in the Associated Roles field every time there is a state change.
- Make an appropriate selection from the Operator drop‑down menu. What you choose here will work with the Value and Percentage radio buttons and the contents of the Alert Threshold field. The Equal To, Not Equal To, Less Than, Less Than Equal To, Greater Than, and Greater Than Equal To selections all work on a single entry in the Alert Threshold field. The In Range and Outside Range selections change the Alert Threshold field into two fields that you can use to specify a range.
- Use the Value and Percentage radio buttons to specify whether the value entered in the Alert Threshold field is an actual number or a percentage. Select the radio button appropriate to your situation.
- Use the Alert Threshold field to specify when an email is generated based on the value entered here and how it is acted upon based on the other settings.
- Use the Alert Once check box to send an email the first time a specified threshold is reached or exceeded and not every time it is reached or exceeded.
- Make the appropriate selection in the Associated Roles field. This will be the role that receives the email alerts associated with the attribute.
- Select Save & Close to commit your changes.
NOTE: The Alert Always checkbox can be a useful tool if you want to keep a close watch on a particular attribute. Under some circumstances, however, it can also overwhelm your email server by generating too many email messages depending on the min. and max. values specified in the Default Setting field in the Edit Attribute dialog box.
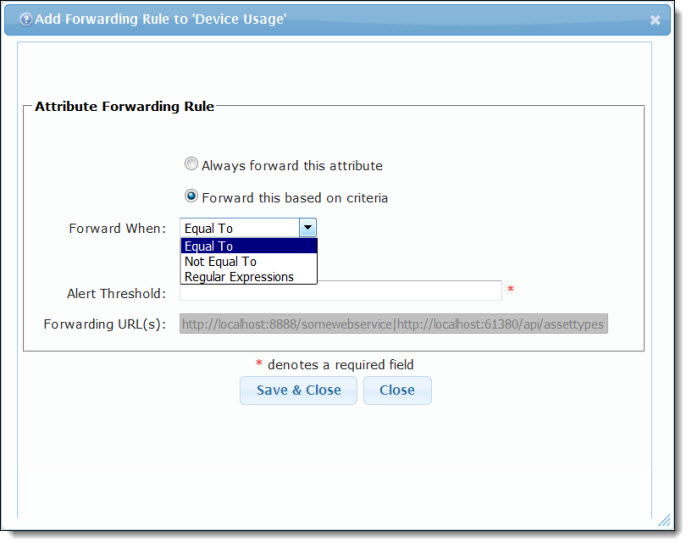
NOTE: For a digital attribute, the Operator drop‑down menu is limited to On and Off. Everything else is the same except for the Alert Threshold field. Since a digital attribute has only two states, there is no need to specify a threshold. In a Serial Attribute, the Operator drop‑down menu contains only choices for Equal To, Not Equal To, and Regular Expressions. Everything else is the same as an Analog Attribute.
Add Forwarding Rules
- Open the Setup web client and click the Attributes tab in the tree window.
- Select an Attribute category or Attribute type, by signal type, from the tree.
- Select the applicable Attribute in the right Attribute pane.
- Select Edit.
- In the Attributes window, select the Forwarding Rules tab.
- Select + Add to add a new Forwarding Rule.
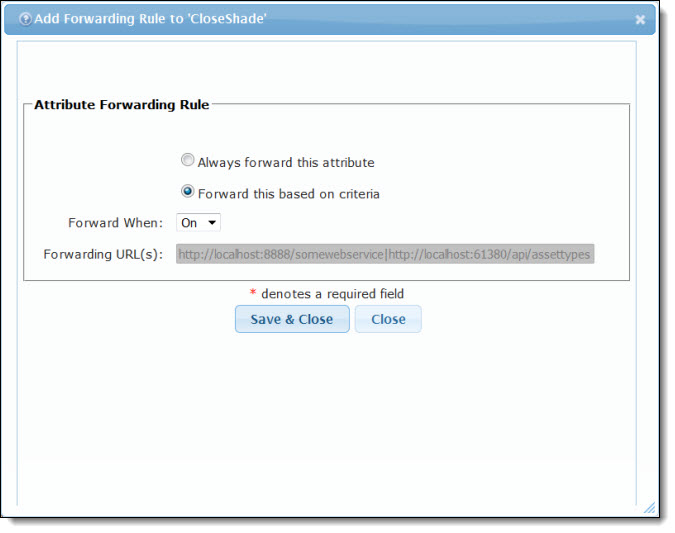
- In Add Forwarding Rule, select the Always forward this attribute or Forward this based on criteria radio button as applicable.
- If Forward this based on criteria was selected, use the Forward When drop‑down menu to designate the logical criteria for forwarding the Attribute.
- Select the Value or Percentage radio button (Analog Attributes) as applicable.
- Enter a threshold criteria (value or percentage) in the Alert Threshold text field.
- Select Save & Close to save the Forwarding Rule.

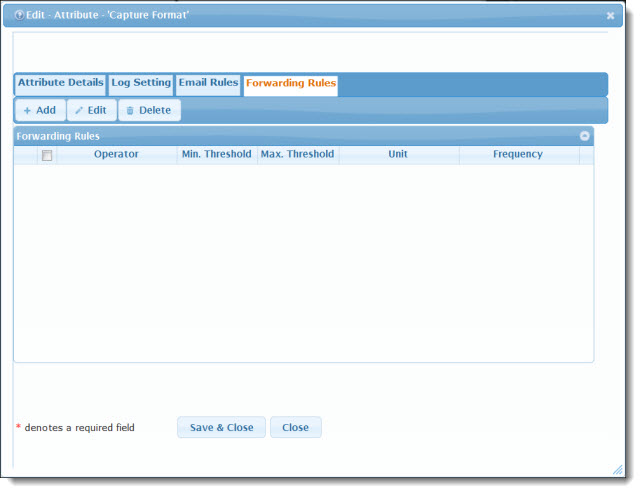


In this example, a Forwarding Rule is being defined for the Analog Attribute: Capture Format.
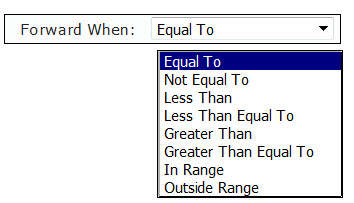
Example - Digital Forwarding Rule
Example - Serial Forwarding Rule
Remove One or More Attributes
- Select the Attributes tab and select the appropriate node.
- Select an attribute, or attributes, on the right by clicking in the appropriate check boxes, and then select Remove. The attribute will be removed.
NOTE: This action does not delete the attribute(s) from the system. It only removes the attribute(s) from the All Attributes node or the subordinate node that contains it. If you look under the Attributes by type node and its subordinate nodes, you will find the attribute(s) still exists in the system.
Delete an Attribute
An attribute can be deleted from any node on the Attributes tab or from the Attributes node on the Objects tab. The process is the same.
- Select the desired attribute and then select Delete.
- Select Delete when prompted to delete the attribute.
Apply Attributes to All Symbols in a Room or Node
You can add multiple attributes to the symbols in a group of rooms or nodes at the same time.
- Select the Rooms tab and select the appropriate node(s) or rooms within a node.
- Select Apply to All Symbols. The Add Attributes to Symbols dialog box opens stating that "The selected attribute and/or attributes belonging to the selected nodes will be applied to all symbols." It then asks to confirm this action.
- Select Save. A success message will appear in green text near the top of the dialog, stating that the transaction was successfully submitted as a deferred task.
- Select Close to dismiss the Add Attributes to Symbols dialog.
Add an Attribute to a Symbol
An attribute can be added to a symbol via the Edit Symbol process under the Rooms tab or the Edit Symbols process under the Objects tab.
NOTE: This procedure can also be accomplished via the Add/Edit Room window.
To add an attribute to a symbol via the Edit Symbol process:
- Select the Rooms tab and select the room containing the desired symbol. The symbol will be displayed in the grid view on the right.
- Select the symbol by selecting its checkbox and then selecting Edit, or by selecting the symbol from the list.
- Select the Attributes tab in the Edit Symbol dialog box.
- Select Add to display the Add Attribute to Symbol dialog box.
- Select the desired attribute(s) and then select Save & Close in the Add Attribute to Symbol dialog (as well as the remaining open dialog boxes) to commit your changes.
To add an attribute to a symbol via the Symbols node on the Objects tab:
- Select the Objects tab and select the Symbols node.
- Select the desired symbol by either selecting its checkbox and then selecting Edit, or by selecting the symbol from the list.
- When the Edit Symbol dialog box opens, select the Attributes tab.
- Select Add to open the Add Attribute dialog box for the selected symbol.
- Make your selection(s) and then select Save & Close to commit your changes.
- Select Save & Close on the Edit Symbol dialog box to commit your changes.
Override an Attribute on a Symbol
An attribute can be added to a symbol via the Edit Symbol process under the Rooms tab or the Edit Symbols process under the Objects tab.
NOTE: This procedure can also be accomplished via the Add/Edit Room window.
To override an attribute via Edit Symbol process in the Rooms tab:
- On the Rooms tab in the tree view, select the tab containing the desired room.
- Select the desired room by selecting its checkbox and then selecting Edit, or by selecting the room from the list.
- Select the Symbols tab in the Edit Room dialog box.
- Select the desired symbol and then select Edit, or by select the symbol from the list.
- Select the Attributes tab in the Edit Symbol dialog box.
- Select the desired attribute and then select Override.
- When the Override Attribute dialog box opens, make the desired changes and select the appropriate Override? check boxes to apply the override values.
- Select Save & Close to commit your changes.
NOTE: Certain reserved attributes cannot be overridden.
To override an attribute via the Edit Symbol dialog box:
- On the Objects tab in the tree view, select the Symbols node.
- Select the desired symbol by either selecting its checkbox and then selecting Edit, or by selecting the symbol from the list.
- When the Edit Symbol dialog box opens, select the Attributes tab.
- Select the desired attribute and then select Override.
- When the Override Attribute dialog box opens, make the desired changes and select the appropriate Override? check boxes to apply the override values.
- Select Save & Close to commit your changes.
Remove an Attribute from a Symbol
An attribute can be removed via the Edit Room dialog box, the Attributes tab, and via the Edit Symbols dialog box. Multiple attributes can be removed at the same time.
To remove an attribute via the Edit Room dialog box:
- Select the appropriate node on the Rooms tab.
- Open the Edit Room dialog box by selecting the check box for the room and then selecting Edit, or by selecting the room from the list.
- In the Edit Room dialog box, select the Symbols tab and then select the desired symbol.
- Select Edit to open the Edit Symbol dialog box.
- Select the Attributes tab.
- Select the check box for the desired attribute, and then select Remove.
- In the resulting message box, select Remove to confirm the removal.
- Select Save & Close in the Edit Symbol dialog box and then in the Edit Room dialog box to save your changes.
To remove an attribute via the Attributes tab:
- Select the Attributes tab, and then select the desired attribute node.
- Remove the desired attribute by selecting its checkbox and then selecting Remove.
To remove an attribute via the Edit Symbols dialog box:
- Select the Objects tab, and then select the Symbols node in the tree view.
- Select the desired symbol by selecting its checkbox and then selecting Edit, or by selecting the symbol from the list.
- When the Edit Symbol dialog box opens, select the Attributes tab.
- Select the check box for the desired attribute, and then select Remove.
- In the resulting message box, select Remove to confirm the removal.
- Select Save & Close in the Edit Symbol dialog box and then in the Edit Room dialog box to save your changes.