Add, Edit, or Delete an Asset
Asset management in Crestron Fusion® software provides you the ability to organize, track, and monitor the condition of any equipment in your organization. Some assets, such as projectors, can be connected to either directly or through a control program, and can provide realtime status feedback to Crestron Fusion. Other assets such as desks and chairs can be managed in Crestron Fusion for inventory purposes or used as part of the room search feature when finding rooms for a meeting.
An asset is added, edited or deleted in the Setup area on the Rooms tab on the tree view. Assets can also be edited or deleted from the Objects tab. An asset can be added to a room or a node.
You can:
Add an Asset
- In Rooms tab of the tree view, select the node or room to which you wish to add an asset.
- Select Add Asset on the tool bar.
- When the Add Asset dialog box opens, the Asset Details tab will be selected by default.
- Enter the asset name in the Name: field.
- Enter a serial number in the Serial Number: field if it is known. This will be an identifying number associated to the asset being added.
- Select an Asset Type from the Type: drop‑down menu. The entries that appear in this drop down are set up in the Asset Types section of Setup.
- Use the Connection Direction drop‑down menu to select Outbound:.
- Enter make information in the Make: field. If appropriate Asset Type drivers have been installed, you can select the ellipses to the right of the Make: field and select the Make and Model of your Asset from the Pick Make and Model dialog box.
- If you manually entered the make, enter model information in the Model: field.
- If your asset supports a direct connection with Crestron Fusion RV (such as a projector or touch screen) and your asset type driver has been defined to support such a connection, select Network from the Connection Type drop‑down menu.
- For assets that support a direct connection, after selecting Network in the Connection Type drop‑down menu, enter the IP address or host name of your asset in the IP Address/Hostname: field.
- Select the Additional Details: tab to enter additional data about your asset. You will see the Economic Lifespan drop‑down menu where you can specify the expected lifespan of your asset.
- The Date of Purchase: field will show a default value of today’s date. You can change this by selecting the field. A month view calendar will open. You can scroll to the month of purchase by selecting the < and > buttons to the left and right of the month. Once you have reached the correct month, select the day that is the date of purchase. The calendar will close and the date of purchase will show your selected date.
- The Warranty Expiration Date: will show a default value of today’s date. You can change this by selecting the field. A month view calendar will open. You can scroll to the month the warranty will expire by clicking the < and > buttons to the left and right of the month. Once you have reached the correct month, select the day that is the warranty will expire. The calendar will close and the warranty expiration date will show your selected date.
- The Asset Tag: can be populated with an identifying code assigned by your company.
- Enter the MAC Address of the asset in the MAC Address: field.
- Select the Custom Properties tab and enter any custom data that has been defined by your company. These fields and the corresponding data is specific to your company’s settings. If your company has not defined any asset custom properties, this tab will be blank.
- Select the Maintenance Details tab and then use the Service Contract drop‑down menu to select a service contract for your asset. Service Contracts are specific to your company and if none are defined, this drop-down meny will be empty.
- The service interval will default to the value defined for the asset type. It can be changed using the Service Interval drop‑down menu.
- Service contact information will populate with address information defined in your contract (under Contracts in the Objects tab). It can be overridden in the Service Contact Information: field.
- Select Save & Close to create the new asset.
NOTE: Assets cannot be added to the Unassociated Assets node or any of its children.

NOTE: A red asterisk next to any field indicates that the field is required.
Outbound: The Crestron Fusion server initiates control system processor discovery.
NOTE: Custom Properties extend the properties of a room or asset. In this way information that is important to the user can be included in the description of the room. Custom Properties also provide much of the criteria used when searching for rooms using the Room Booking Wizard. The results of the choices you make when setting up Custom Properties for a room or asset are displayed on the Resources tab of the Room Booking Wizard.
Edit an Asset
- In the Rooms tab, with a room selected in the tree view, select an asset in a room or select the check box to the left of the asset, and then select Edit in the tool bar. The Edit Asset window for the selected asset is displayed.
- Make any changes to the asset fields on the Asset Details, Additional Details, Custom Properties, or Maintenance Details tabs.
- Select Save & Close to update the asset.

NOTE: The Attributes tab on the Edit Asset dialog box will be displayed when Symbol Discovery detects attributes attached to an asset that has a symbol or when attributes are contained in a driver file. Attributes for connected assets are displayed for reference only and cannot be changed after the Symbol Discovery process.
Move an Asset
Assets can be moved between nodes and rooms as well as moved to the Unassociated Objects Asset Node.
- In the tree view grid, select the node or room where the asset currently resides. This will display the asset in the grid list.
- Select the asset and, while holding down the left mouse button, drag the asset to the desired node or room, then release the left mouse button.
NOTE: You can move multiple assets by selecting the check boxes next to the assets you wish to move and then dragging all of them.
The asset(s) will be moved to that node or room.
Delete an Asset
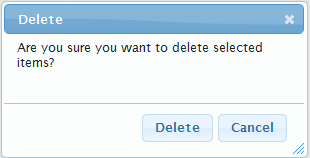
- With a room selected in the tree view, select the check box to the left of the asset, and then select Delete in the grid tool bar. This will open a Delete alert box for the selected asset.
- Select Delete to delete the asset.