Set up Microsoft Graph to Delegate Access
Crestron Fusion® software allows Microsoft Graph to delegate access. The permissions given in Crestron Fusion sync with Microsoft Azure. This helps Crestron Fusion to communicate with Microsoft Azure to manage the resource mailboxes (for example: mailbox of meeting rooms).
Create and Configure a Microsoft Azure Active Directory App Registration
To create and configure a Microsoft Azure Active Directory App registration:
-
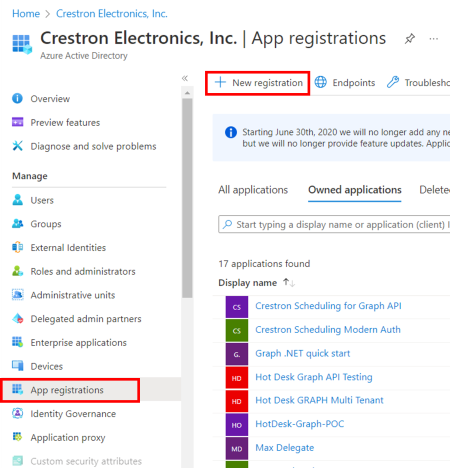
Sign into the Microsoft Azure portal (portal.azure.com).
-
Select Azure Active Directory.

-
Select App registration from the left navigation menu.
-
Select New Registration.

-
Enter the following information in the Register an application window:
-
Enter an application name in the Name field (for example: MS Graph Delegate).
-
In Redirect URI (optional) section:
-
Select Web from the Select a platform menu.
-
Enter https://{your Fusion Server}/fusion/webclient/setup/pages/msgraphtoken.aspx in the URI field.
note: Use the secure HTTPS for the redirect URI. Use HTTP only if Crestron Fusion is on the local host.
-
-
Select Register.

-
-
Select Overview from the left navigation menu, then copy and paste the Application (client) ID and Directory (tenant) ID to an accessible location on the computer.

note: Use Copy to clipboard at the end of the respective fields to copy the entire IDs.
-
Select Certificates & secrets from the left navigation menu.
-
Select New client secret.

-
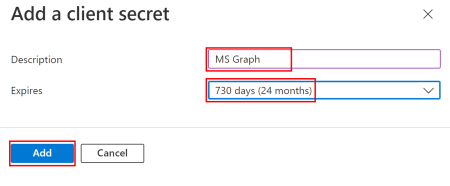
In the Add a client secret window:
-
Enter a description in the Description field (for example: Microsoft Graph).
-
Select 730 days (24 months) from the Expires menu.
-
Select Add.

-
-
From the Client secrets tab, copy and paste the client secret Value to an accessible location on the computer.

note: Use Copy to clipboard at the end of the respective field to copy the entire ID.
Add Permissions to API
To add the required permissions to the API:
-
Select API permissions from the left navigation menu.
-
Select Add a permission.

-
Enter the following information in the Request API permissions window:
-
Select Microsoft Graph.
-
Select Delegated permissions.
-
Expand the available permission groups and select the following permission(s).
-
OpedId permissions: email; offline_access
-
Calendars: Calendars.ReadWrite
-
User: User.Read; User.ReadWrite
-
-
Select Add permissions.

note: The Microsoft Azure portal delegates the selected permission(s).
-
-
Select Grant admin consent for [Azure Account Name], where [Azure Account Name] is the name of the active Azure account.
-
Select Yes to Grant admin consent confirmation for the selected permissions.

note: The Status column of the table in Configured permissions changes to Granted for [Azure Account Name], where [Azure Account Name] is the name of the active Azure account, after permissions have been granted.
Select Rooms in Microsoft Exchange to Allow Delegate Access
To select rooms in Microsoft Exchange to allow delegate access:
-
Sign into the Microsoft Exchange portal (admin.exchange.microsoft.com).
-
Select Resources from the left navigation menu.
-
Select the Display name of any resource to open the Details of the resource window.
-
Select Manage delegates in the details of the resource window.

-
Add Microsoft Azure Active Directory user(s) in the Add or remove a delegate field.
-
From the Select permission types menu, select Full access to delegate permissions to the added user(s).
-
Select Save.

The portal displays the Delegates updated message once the portal saves the information.
-
Repeat steps 3 to 7 for every resource which needs delegation.
Create a Connection Set in Crestron Fusion
To create a connection set in Crestron Fusion:
-
Sign into the Crestron Fusion portal (https://{your Fusion Server}/fusion/webclient/setup/).
-
Select Open.

-
Select Setup.

-
Navigate to Objects tab > Connection Sets > Add.

-
In the Add - Connection Set window, create a connection set for Microsoft Graph API using the new Delegate App Registration:
-
Add a user defined name of the connection set in the Name field (for example: MS Graph Delegate).
-
Select MS Exchange: Graph API from the Server Access menu.
-
Select the checkbox for Use Delegated Permissions.
-
Add the copied M365 Tenant ID.
-
Add the copied Client ID (Application ID).
-
Add the copied Client Secret.
-
Add Server URL (for example: https://graph.microsoft.com/v1.0).
-
Under Change Notifications, select Poll from the Method drop-down menu.
-
Select Get Tokens.

note: After selecting Get Tokens, Crestron Fusion redirects you to the Microsoft Azure portal.
-
-
Sign into Microsoft Azure portal, if required.
-
In the Microsoft Azure portal, select the check box Consent on behalf of your organization to grant consent to the Permissions requested.

-
Select Accept.
Crestron Fusion and Microsoft Azure portals exchange data and the Add - Connection Set window closes after saving.
Add a Room to Crestron Fusion Using the New Connection Set
To add a room to Crestron Fusion using the new connection set:
-
Sign into Crestron Fusion portal (https://{your Fusion Server}/fusion/webclient/setup/).
-
Select Open.

-
Select Setup.

-
Navigate to Rooms tab > Add > Add Room.

-
Enter the following information in the Room Details tab of the Add Room window:
-
Enter the name of the room in the Name field.
-
Enter a description of the room in the Description field.
-
Select a server group from the Server Group field.

-
-
Enter the following information in the Scheduling Details tab of the Add Room window:
-
Select MS Exchange: Graph API from Server Access menu.
-
Select the connection set from the Connection Set drop-down menu.
Crestron Fusion populates the name(s) you have given in the Create a Connection Set in Crestron Fusion section. -
Add the room to Calendar Email Address.
-
Select Verify Mailbox Setting.

Crestron Fusion displays the successfully verified message:
-
Select Close.
-
Select Save & Close.
-