Toolbox
Addresses in Crestron Studio®
Crestron Studio®
creates and maintains a separate Toolbox Address Book for each system
project you create. The project's Address Book lists all devices in a
specific project that can communicate with your PC. Address Book
entries are saved in an .adr file;
these entries can be edited, renamed and removed. Address Books can be
also be imported or shared with other programmers.
To open the Toolbox
Address Book dialog for your current project:
-
Click on an
addressable device (for example, a control system or a touch screen)
in the System Tree
in System Designer ®. Double-click
on the Equipment folder to
expand the System Tree
if necessary.
-
Make sure
that the Properties Grid of
the device is visible; if necessary press  or click
on the
or click
on the  button to display the Properties
Grid.
button to display the Properties
Grid.
-
Navigate to
the Setup Address Entry Name
in the Name section of the
device's Properties Grid and
click on the Ellispe button  to
the right.
to
the right.
-
The Address Book Dialog for your current
project opens:
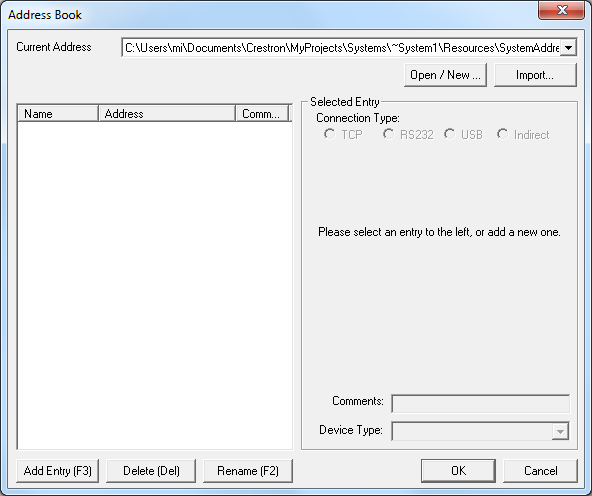
To
open an Address Book for a different project or to use the default
Toolbox Address Book:
-
Open the Address Book Dialog for the current
project.
-
Point to the
Current Address list box:

-
Click the
drop-down arrow to select the desired .adr
file from the list of existing address books.
To use the default Toolbox Address Book, choose DeafultAddressBook.adr:

To select, add or modify entries in an
existing address book:
To
add a new Ethernet/TCP/IP Toolbox Address Book Entry
-
Click on the
Add Entry (F3) button or press
F3.
-
Type a name
for the Ethernet device in the Name
Field.
-
Select the
TCP radio button under Connection Type
in the Selected Entry group
box.
-
Enter the
device IP address or hostname in the IP
Address/Hostname field or choose it from the drop-down box
if it is listed. If the device is configured for DHCP, the Hostname
is the fully-qualified domain name.
-
Enter the
port number in the Port (if not default)
field.
-
Enter the password,
if applicable, in the Password
field.
NOTE: The password may be visible
on some user interface elements which display the current address.
-
Enter the
PAT hostname in the PAT Hostname
field.
-
Enter the
PAT port in the PAT Port field.
-
Select the
SSL check box only if the device is configured
for SSL encryption.
NOTE: If the SSL
check box is selected and
the device is not configured for
SSL, then the connection will fail when attempting to establish a session.
-
Select the
Use Secondary Console check
box for 2-Series control processor support for
two Ethernet connections to the console on port 41795. Select this
option to allow two discrete control processor sessions. In this mode,
commands entered in one text console will not be displayed in the
second text console.
NOTE:If
the Use Secondary Console check box isnotselected and two control processor text console sessions
are open, then text is displayed in both consoles.
-
Enter a comment in
the Comments field for reference
purposes, if applicable.
-
Select Auto-Detect
from the Device Type drop-down
list. For standard applications, the device type
should always be set to Auto-Detect.
-
To
add additionalEthernetAddress Book entries, clickAdd Entry (F3)button
or press F3.
-
Click the OKbutton when finished.
To add an RS232 Toolbox Address Book Entry
-
Click on the
Add Entry (F3) button or press
F3.
-
Type a name
for the RS232 device in the
Name Field.
-
Select the
RS323 radio button under Connection Type
in the Selected Entry group
box.
-
To change
the default RS232 settings, select the appropriate Port,
Baud Rate, Parity,
Data Bits, and Stop
Bits radio buttons in their respective group boxes under the
Selected Entry group box.
In addition, select the XON/XOFF
and RTS/CTS check boxes accordingly.
-
Enter a comment
in the Comments field for
reference purposes, if applicable.
-
Select Auto-Detect from the Device
Type drop-down list. For standard applications, the device
type should always be set to Auto-Detect.
NOTE:
Default RS232 settings are:
-
-
-
To add additional RS232
Address Book entries, click Add Entry
(F3) button or press F3.
-
Click the OK
button when finished.
To
add an USB Toolbox Address Book Entry
-
Click on the
Add Entry (F3) button or press
F3.
-
Type a name
for the USB device in the Name
Field.
-
Select the
USB radio button under Connection Type
in the Selected Entry group
box.
-
Type the optional search parameters, as follows (only
if connecting to a Crestron USB device; otherwise, the search fields
can be left blank):
-
-
Model:
Type the Crestron-defined model name of the Crestron device. If
two identical device models are part of the system, then hostname
and/or serial number is also required
-
Hostname:
Type the user-defined hostname, as assigned previously in the
TCP/IP settings.
-
Serial:
Type the serial number (not the model number or TSID)
of the Crestron device in the Serial field. The serial number
is a 7-digit number not
beginning with 60 or 65, that may contain letters. (The model
number always begins with a 60 or 65, and does not contain letters.)
-
Enter a comment
in the Comments field for
reference purposes, if applicable.
-
Select Auto-Detect from the Device
Type drop-down list. Device Type:
For standard applications the device type should always be set to
Auto-Detect.
-
To add additional USB
Address Book entries, click Add Entry
(F3) button or press F3.
-
Click the OK
button when finished.
To add an Indirect Toolbox Address Book
Entry
-
Click on the
Add Entry (F3) button or press
F3.
-
Type a name
for the device in the Name
Field.
-
Select the
Indirect radio button under
Connection Type
in the Selected Entry group
box.
-
Click on the appropriate radio
button: Cresnet ID, inifiNET (EX) ID, Slot
Number, Two-Way RF ID
or COM Port (Passthrough)
in the Device is at group
box.
-
Click on the drop-down list's drop-down
arrow to select the appropriate ID or slot number.
-
For COM
Port (Passthrough), click on the right-arrow next to radio
button, and then click on the drop-down arrows in the sub-menu to
select the appropriate COM port settings.
-
To route this address book entry
through an existing entry, click the drop-down arrow in the Through field and select an entry.
-
Enter a comment in the Comments
field for reference purposes, if applicable.
-
Select Auto-Detect from the Device
Type drop-down list. Device Type: For standard applications
the device type should always be set to Auto-Detect.
-
To add additional Indirect
Address Book entries, click Add Entry
(F3) button or press F3.
-
Click the OK
button when finished.
To delete a Toolbox Address Book Entry
-
To delete an address book entry,
click on the entry in the Address
Book Entry list box.
-
Click the Delete
(Del) button or press Del.
-
Click the OK
button when finished.
To rename a Toolbox Address Book Entry
-
To rename an address book entry,
click on the entry in the Address
Book Entry list box.
-
Click the Rename
(F2) button or press F2.
-
Press Backspace
to delete the existing name.
-
Type the new name and press Enter.
-
Click the OK
button when finished.