Enabling a Location as a Lighting Zone
In Crestron Studio®
you can assign specific locations in your project to be enabled as Lighting Zones. Lighting Zone is
a software-implemented location (or a type of special logic device) that
manages dimmers and switches that control actual lights in your system.
A Lighting Zone enabled location
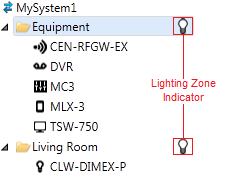
is identified by the Lighting Zone indicator . When a location is enabled as a Lighting
Zone, Crestron Studio®
adds room-based lighting template pages to touch screens in this location
and a list of lighting properties (such as scene names and fade times)
are enabled in the Properties Grid
for the location:
. When a location is enabled as a Lighting
Zone, Crestron Studio®
adds room-based lighting template pages to touch screens in this location
and a list of lighting properties (such as scene names and fade times)
are enabled in the Properties Grid
for the location:
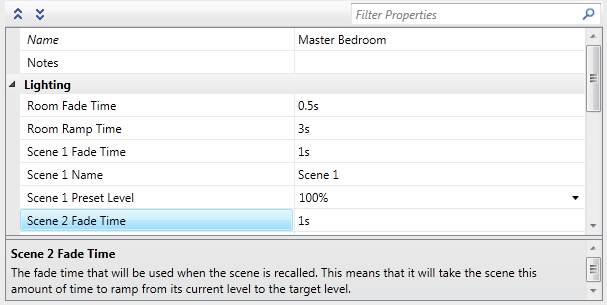
Each property shown in the Property column of the Properties
Grid has a corresponding default value shown in the Value column.
To overwrite the default value, type the new value into the Value field
or click the field and select the value from the drop-down list.
Note:
To enable a location as a Lighting
Zone automatically: Crestron Studio®
automatically enables a location as a Lighting Zone the first time you
add to it a 'lighting device' such as a dimmer or a lighting switch.
To enable a location as a Lighting Zone manually:
-
Select the desired location in the System
Tree and point to the gray light bulb icon on the right to
"light up" the Lighting Zone indicator.
-
(optional)
Adjust the desired lighting properties for your location. If you are
unsure about the meaning of a property, select it to display a short
definition in the description pane of the Properties
Grid:
Press on the Lighting Zone indicator again to disable the Lighting Zone
for this location. A Lighting Zone is also disabled when all lighting
devices are removed from this location.
NOTE: Note that when the Lighting Zone designation for a
location is disabled, Crestron Studio®
removes the logic device for the Lighting
Zone and any custom programming targeting the device (for example,
removing generated touch screen pages)!