Rooms in Crestron Fusion®
The procedure(s) described below assume that Crestron Fusion®
has been properly setup andconfigured.
Entities in Crestron Fusion®
are organized in a node hierarchy that initially consists of a Root
node and a node containing un-associated objects (i.e., Assets, Processors,
Rooms and Symbols) that are not yet part of a room.
To Add a new Node to the Hierarchy Tree:
-
Navigate to the Setup
area of Crestron Fusion®
by clicking Open on the Fusion Header Tab:

and selecting Setup:

Select the Root node (or other desired node) in the Rooms pane on the
left
-
Click + Add button on
the tool bar in the right pane

-
Select Add Node.
-
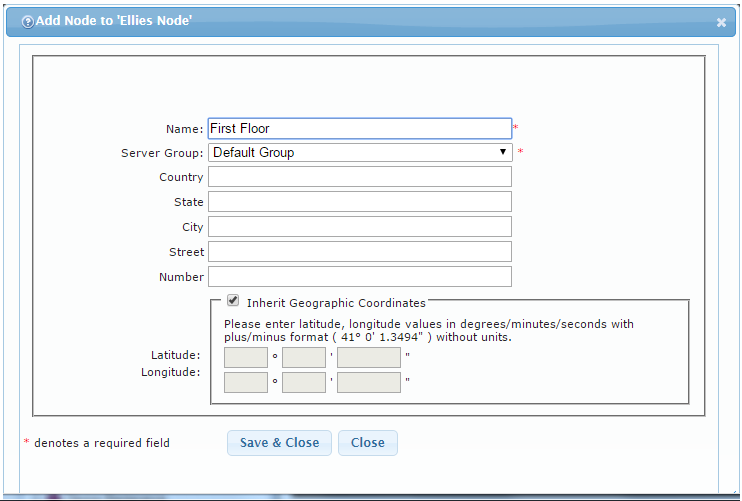
In the Add Node to 'Root'
dialog enter Name for the new node into the corresponding text field.
Fill in any other information as desired.
-
Click Save & Close
to create a new node. Click Close
to exit the dialog without creating a node.
Adding Fusion rooms from Crestron Studio® to Crestron Fusion® for monitoring
All Fusion symbols from programs created in Crestron Studio®
can be added to Crestron Fusion®
by using the Symbol Discover functionality. Symbol Discover can be used
to add to Crestron Fusion®
one or multiple rooms or nodes from one or more processors. A node is
added for every Crestron Fusion Node or Crestron Fusion Room (including
user-added Fusion Node/Room) symbol found in the program.
Alternatively, Fusion symbols can be added manually by adding a room
to your node and associating control processor with the new room. However,
Crestron recommends using the Symbol Discover functionality.
IMPORTANT: SSL authentication should
be turned off during the discovery process. If desired it can be turned
on after the discovery process has finished.
To add room(s) from one or more processors
to Crestron Fusion®
by using Symbol Discover to 'import' Fusion rooms created in Crestron Studio®
-
Navigate to the Setup
area of Crestron Fusion®
by clicking Open on the Fusion Header Tab and selecting Setup
-
Choose a node where the newly discovered rooms will be added
by clicking on a node in the Rooms
tab in the left pane or selecting node displayed in the main grid.
-
Click Symbol Discover
on the tool bar.

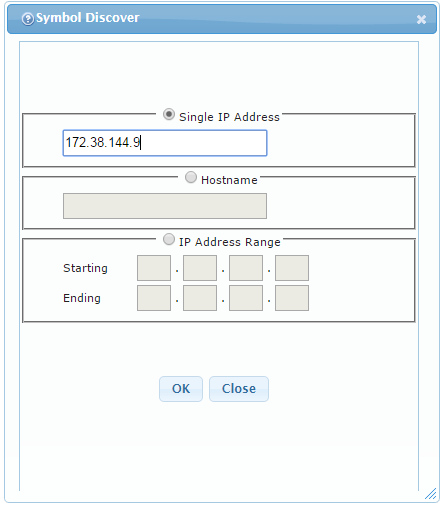
The Symbol Discover window opens.
-
Select the appropriate radio button and specify an IP address,
a hostname or a range of IP addresses of the control system(s) in
the corresponding text entry field(s)
-
Click OK to run the
discovery or Close to cancel
it.
If you click OK, the 'Confirm
Auto-discover' window opens. Read it carefully before continuing with
the Symbol Discover process.
-
Click Yes to start the
Symbol Discover process. Crestron Fusion®
starts searching for symbols within the specified IP address, hostname
or IP address range. After successful discovery the 'Symbol Discover'
window displays 'Success' next to the IP address/hostname of the control
system and newly discovered rooms and their assets are added to the
existing room hierarchy.
 How do I delete
a room in Crestron Fusion®?
How do I delete
a room in Crestron Fusion®?
 To delete a room, simply click the check box for the room and then click
the Delete button. A "Delete" prompt will appear.
To delete a room, simply click the check box for the room and then click
the Delete button. A "Delete" prompt will appear.
Click
Delete to proceed with the room deletion or click Cancel
to abort the operation.
NOTE: When deleting a room, make sure to delete the processor associated
with the room as well.
To delete the room processor:
-
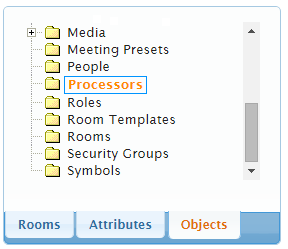
Click Objects tab
at the bottom of the tree view pane on the left.
-
Select the Processors folder:
-
Select the processor to
be deleted by clicking in its check box.
-
Click the Delete button
on the tool bar. Click Yes
in the Delete confirmation dialog.
-
Click Delete to delete
the processor
Do I have to worry about regenerating Instance IDs if I have a program
uploaded to multiple control systems?
No, Crestron Studio®
takes care of updating the Instance IDs. All you have to do is discover
the rooms for each control processor and rename the rooms with duplicate
names. Room names will be updated by the Fusion server and reflected in
the touch screen template pages.