Use the  Device
Description tab to fill out details about the
device being controlled.
Device
Description tab to fill out details about the
device being controlled.
Enter or edit information about the device being controlled,
as follows: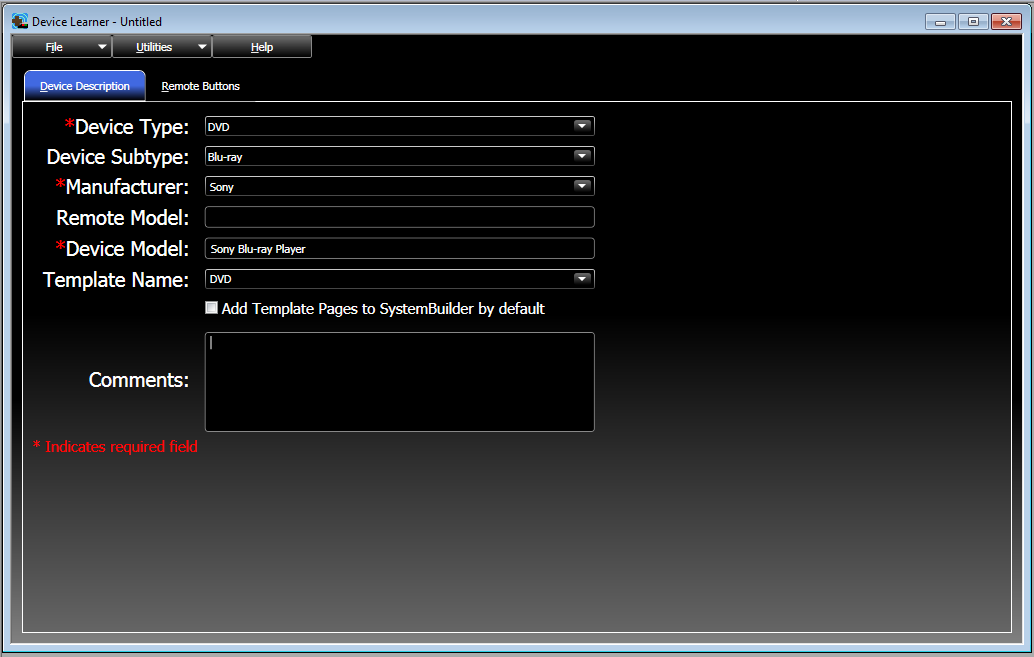
Device Type: Select the device type from the list. The device type determines which standard commands will be available when learning the remote button functions and what template pages will be generated for the device.
Device Subtype : To further filter the device by subtype, select the subtype from the list.
Manufacturer: Select the manufacturer from the list. Make sure to specify the correct manufacturer as this field determines which discrete commands will be available. Discrete commands are IR codes that are known to work for all of that manufacturer's devices.
Remote Model (optional): Type the model name of the IR remote that will control the device.
Device Model : Type the device model in the text field. The device model determines the name of the device as it will appear in the Product Browser. The Device model name is also used as the default name for the IR file.
Comments (optional): Type comments and general information in the text field.
Use the Remote Buttons
tab to configure the buttons on the remote control.
Depending on the selections made in the Device Description tab and the Preferences dialog, the Remote Buttons table will be populated with the fields described below.
Additionally you can change the
order of fields in the table, or add, rename, remove buttons from the Remote Buttons
table
In the Remote buttons table you can also perform some additional operations on remote buttons, such as: adding new buttons, removing buttons, formatting button label text, etc. The exact operations available depend on the selections made in the Device Description tab and the Preferences dialog.
To add new remote button to the Remote Buttons table
-
Click the Plus button. This will create a new button at the bottom of the table.
-
Type a name for the button.
To sort buttons
-
Click and drag any button to the desired position in the table. You can also right-click the button and click Move Up or Move Down.
-
To sort buttons alphabetically, right click the table and select Sort by Name.
To rename a button
-
Double-click the button and type the new name. Or select it and press F2 (or click the Rename button). You can also right-click the button and click Rename.
To remove a button
-
Select the button and press Delete (or click the Remove button). You can also right-click the button and click Remove.
-
Click OK to confirm, or Cancel to cancel out.
Removing a button will delete it from the Remote Buttons table.
To restore a button that was removed in error
-
If the button is associated with a standard command, click Add Missing Standard Commands on the Utilities menu.
-
If the button is a manufacturer-specific command, click Add Missing Manufacturer-Specific Commands on the Utilities menu.
To format button labels
The button label text format is used in SB Ready tools when the user views the list of IR commands the device provides.
You can set the text format by right-clicking the button and selecting the desired format from the context menu, as follows:
-
Make Button Name Uppercase: The default setting. All letters are uppercase.
-
Make Button Name Lowercase: All letters are lowercase.
-
Capitalize Words in Button Name: Capitalizes the first letter of each word in the button name.
To cut, copy and paste buttons (between IR files)
-
Right-click the button (to multi-select, press the Shift or Ctrl key and then right-click).
-
Click Cut to cut (remove) the buttons from the Remote Buttons table.
-or-
Click Copy to copy the buttons to the clipboard.
-
Go to the target IR project and right-click inside the Remote Buttons table.
-
Click Paste. The copied buttons will automatically be assigned to the correct categories.
To do so click and drag the fields to the desired positions across the top of the table.
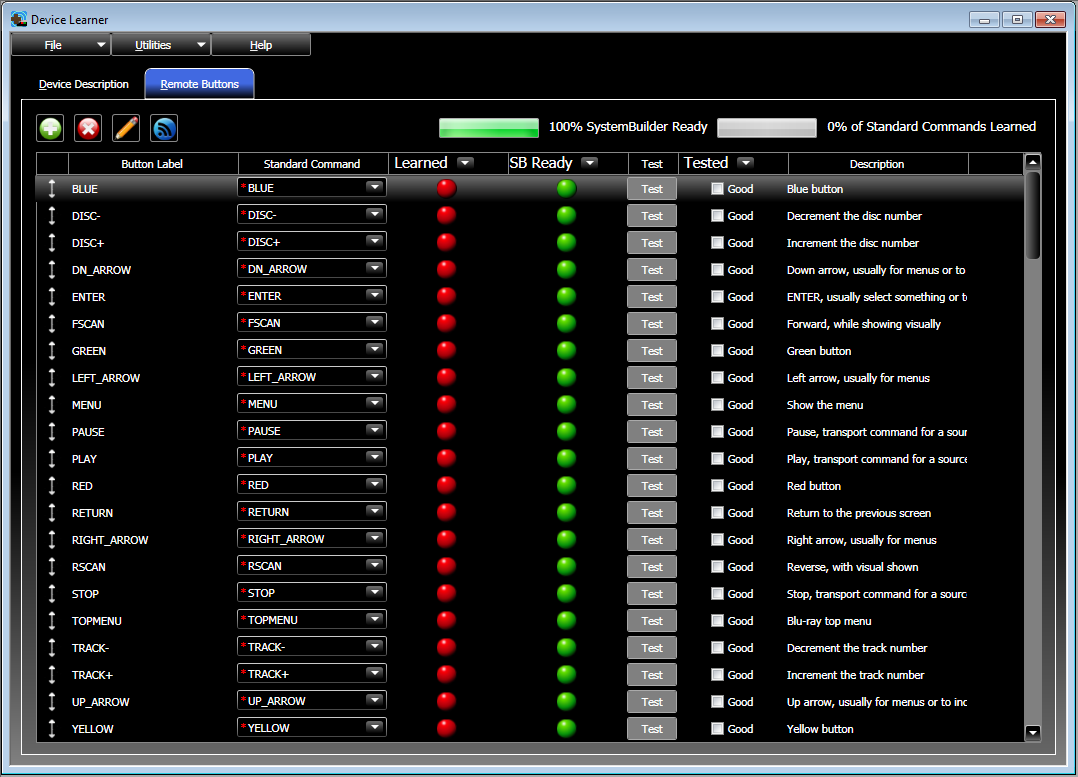
Button Label: This field is based on the device type and/or manufacturer, and shows labels for the buttons on the remote. The Button Label field is automatically populated with button labels corresponding to standard commands and manufacturer-specific commands, unless the options Add Standard Commands by default and/or Add Manufacturers-specific commands by default are disabled in the Preferences dialog accessible via clicking Preferences in the File menu.
Standard Command: This field is based on the device type. Each device type has corresponding standard commands, and for each standard command a button label is created with the same name. The field is automatically populated, unless the options Add Standard Commands by default and/or Add Manufacturers-specific commands by default are disabled in the Preferences dialog accessible via clicking Preferences in the File menu.
To change the standard command for a given button label, select the new command from the drop-down list. Or select None to select no standard command.

Only one button can be assigned to each standard command.
To view additional information about a button, right-click inside
the Remote Buttons table and select Button
Details...:
Multi-Code: A multi-code button is one that triggers different functions with each button press. For example, a source select button might have one code for a TV Tuner, a 2nd code for a VCR, and a 3rd for a DVD. The remote would cycle between the three codes each time the button is pressed.
Another use for multi-code is to distinguish between a single press and repeated presses, such as with a channel selection button. To tune to channel 55, for example, the "5" button must be pressed twice, with each press of "5" resulting in a different code.
This field will initially be marked as Unknown. During the learning procedure, each function will be learned in sequence and the field will display the first learned IR code against the total number of codes e.g., "1 of 3".
To cycle between multi-code functions, right-click the item and click Previous Multi-Code or Next Multi-Code. The Multi-Code field will indicate the current IR code, e.g., "2 of 3" or "3 of 3", and display the associated standard command.
To remove a function from the multi-code sequence, cycle to it as described above, right-click the item and select Remove Current Multi-Code.
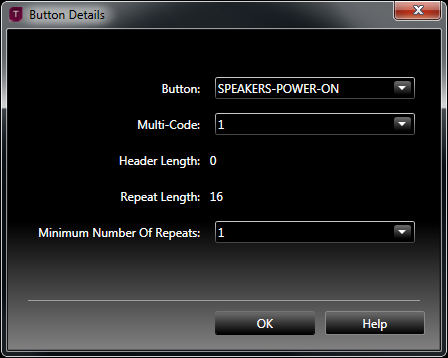
Multi-Code: If the currently selected button is multi-code, select the code number from the list to view its properties. Each IR code in the sequence may have a different header length, repeater length and minimum repeats setting. If the button is not multi-code the drop-down will only show "1".
-
A multi-code button is one that triggers different functions with each button press. For example, a source select button might have one code for a TV Tuner, a 2nd code for a VCR, and a 3rd for a DVD. The remote would cycle between the three codes each time the button is pressed.
Another use for multi-code is to distinguish between a single press and repeated presses, such as with a channel selection button. To tune to channel 55, for example, the "5" button must be pressed twice, with each press of "5" resulting in a different code.
Header Length: This read-only field shows the length of the header section of the IR code. A value of 0 signifies that the IR code contains no header.
-
The header section is an IR sequence that alerts the receiving device that an IR code is beginning. The header section always gets transmitted initially and only once upon a button press.
Repeat Length: This read-only field shows the length of the repeater section of the IR code. A value of 0 signifies that the IR code contains no repeater section (which will occur if the button is set to Pulse Only).
-
The repeater section is an IR sequence that will be continuously transmitted for as long as the button is held down. If the button is released quickly the repeater section will still be transmitted for the specified minimum repeats (4 repeats by default).
Minimum Number of Repeats: To change the minimum repeats setting for the current button, select the desired number of repeats (1 through 15) from the list.
-
The minimum repeats setting guarantees that a Pulse and Hold IR command is transmitted the specified number of times, even if the button that triggers the command is released quickly.
By default the minimum repeats for all Pulse and Hold commands is 4 repeats. The default setting for all buttons can be changed to 1 repeat. -
The minimum repeats setting is not used for Pulse Only commands.
Learned: This field
will show a red circle icon  if the
IR code has not yet been learned. Once learned, the field will
show a green circle icon
if the
IR code has not yet been learned. Once learned, the field will
show a green circle icon  .
.
To filter the remote button list by the Learned status, click the arrow button next to the Learned field and select the Learned or Not Learned check box. This will display a filter icon next to the field.
Test button: Press the Test button to perform a test of the corresponding IR function, which verifies that the corresponding command works on the actual hardware.
Tested: Use this field to indicate the results of the button test. If successful, select the Good check box to indicate a valid IR function. If unsuccessful or not yet tested, clear (de-select) the check box.
To filter the remote button list by their Tested status, click the arrow button next to the Tested field and select the Good or Not Good check box. This will display a filter icon next to the field.
Description: This field is read-only and gives a short description of the button's function.
Learn the remote button
functions
To learn the functions of the remote button follow the steps below:
-
Set up the IR learner and remote (refer to the Crestron IR learner's hardware documentation).
Note that both devices (IR learner and remote) should be positioned close to each other, on a level surface, and should not move.
To set the IR learner to "non-repeat" mode, click Enable Non Repeat Mode on the Utilities menu. This function can be used to increase learning accuracy for some remotes, but should not be used unless you are certain the codes are non-repeating. -
In the Remote Buttons table, click the desired button (to multi-select press the
 or
or  key) and click Learn.
-or-
Click Learn All to learn all the buttons in the table.
-
Following the prompts in the 'Learn IR' dialog, press and hold the specified button on the remote.
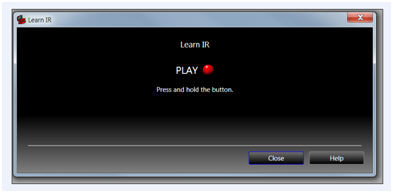
Continue holding the button until prompted to release the button. (Letting go of the button too quickly will result in an error message.)
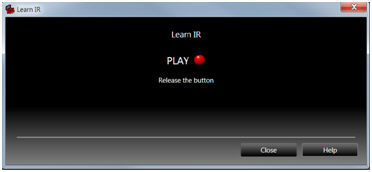
Depending on the function you may be prompted to press and hold the button again. If the button is multi-code you will be prompted to press the button multiple times.
-
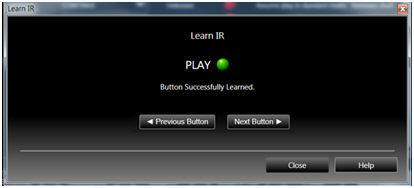
Continue pressing and releasing the button as prompted until the button is learned. The dialog will show a green circle icon next to the button name when the button is learned.
-
If you are learning multiple buttons or all buttons, click Next to continue to the next button. You can skip buttons or cycle between them by clicking Next and Previous.
-
Repeat the above steps for any additional buttons that need to be learned.
-
Click Close when all buttons are learned.