
Multi-device control
A common application for the Buffer symbol is to allow control of many devices using a shared set of buttons. This is useful when programming hand-held remote transmitters, which have a limited set of buttons. A typical layout for such a remote is to have one set of transport buttons, with different source select buttons to determine which device the transport buttons will control.
Because a Buffer works like a compound AND symbol, we often need to generate "state" signals. That is, signals whose value denotes the state of something in the system. In this example we will need signals for each source which tell us whether that source is currently selected or not. We will simply assume that we have them. See the sample program below.
Note from the example that only one Buffer should be enabled at any given time. If two Buffers were enabled at once, pressing the PLAY button would cause multiple commands to be issued, which is not what we want in this example. To ensure that this does not happen, we can force only one of the state signals to be high at any time.
Triggering multiple events
The power of a custom-programmed control system is that you can provide users with automated functionality to meet their exact needs. A well-designed control system will allow the user to do what they need with as little user-interaction as possible. This requires that in many cases a single button press will trigger multiple events.
The nature of the SIMPL language makes it relatively easy to cause multiple events to occur off of a single button press (or any event for that matter). For example, if a button labeled ’r;system on’ were designed to lower the screen, turn on the video projector, and select a certain lighting preset, this could be accomplished by connecting the button’s output signal to a relay to lower the screen, to the ’r;Power_On’ command on the projector’s IR driver, and to a string literal on the RS-232 driver for the lighting system. Without any logic programming we have accomplished our goal. This is shown below.

However there are drawbacks to the above method. First, programs written in this matter can be difficult to read, in that you must trace the signal completely to determine what events it triggers. This is made easier by the ’r;Show Routings’ command in SIMPL Windows. The second drawback is more serious: what if you wanted to provide individual control of the screen, the projector power, and the lighting presets? With the example shown above, these three functions are tied together and can never be controlled independently. Even if you think that this type of control is not needed, it may be needed in the future, requiring you to make significant changes to your program.
To avoid this limitation, we can add logic to the program. An intuitive solution uses OR symbols to gather all the events used to trigger a single event. For example, if we want to lower the screen on the ’r;system on’ button press, or when the ’r;screen down’ button is pressed, we use an OR to accomplish this. The figure below shows an equivalent program to the one above, now using OR symbols, thus allowing for independent control of each function.
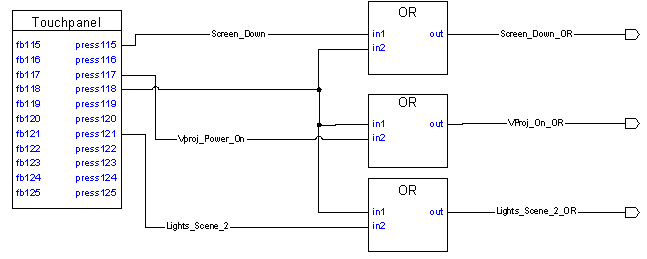
This example is more flexible, but also has drawbacks. First, like the previous example, programs will be hard to follow, especially as they get larger; for each function you must trace back through an OR symbol to determine which events trigger it. Second, as your program grows there may arise other occasions where you need to trigger a function. For example, perhaps you want to lower the screen automatically every time a source is selected. This can be handled by simply increasing the number of inputs to the appropriate OR symbol, but ultimately this leads to a "messy" and hard to debug program.
This now leads us back to the Buffer symbol. Remember that the output signals on a Buffer may be tied to existing signals that are driven by system inputs or by other Buffers. This enables us to create an elegant program that uses one or more Buffers to handle all the multi-event triggering. Shown below is a program that performs more functions than the OR symbol example above, yet uses only a single symbol.

You will notice two interesting features about this example. First, the enable input has a signal called "1" connected to it. Earlier in the manual we described this special signal as a digital signal that always has a value of logic high. In this case, this will cause the Buffer to be permanently enabled. This is useful when you are using the Buffer not to control the flow of signals, but to ’r;map’ one signal name into many others, as we have done here. The second unique feature of this example is the fact that we have used the same signal name multiple times in the input side of the Buffer. This allows multiple output signals to be driven high when a single input signal goes high. Finally, notice that because the input/output pairs of the Buffer are independent of one another, we have used a single symbol to generate the system on and system off sequences. However, for clarity we could have just as correctly used two separate symbols.